
Build persisting Layer with
ASP.NET Core and EF Core using Postgresql and Sql Server 2016
Source : https://github.com/didourebai/Samples.AspCoreEF
This post is
about developing ASP.NET Core application using EF Core, we will demonstrate
how we can connect in different ways to Sql Server Database and Postgresql
Database.
So let’s start
by Prerequisite:
-
Visual
Studio 2015 update 3
-
.NET
Core 1.0.
-
SQL
Server 2014 / 2016 Server Management Studio with a default localdb.
We will follow
in this article these steps:
1- Create
Database : samplecoreEF
2-
Create an ASP.NET Core Web Application :
Samples.AspCoreEF
3-
Add
Class Library Core to the solution : Samples.AspCoreEF.DAL.EF
4-
Create
model classes: Task and Person.
5-
Add
Context : TaskSystemDbContext
6-
Register
the context class with Dependency Injection.
7-
Auto-Create
the database.
8-
Add
Web API controller and test using Postman.
I.
Create Database : samplecoreEF
Create a new
database “sampleCoreEF” in
PostgreSQL
.


Create a new
database “sampleCoreEF” in SQL
server 2016

II.
Create an ASP.NET Core Web Application:
Samples.AspCoreEF
We Open Visual
Studio > File > New Project> Select “ASP.NET Core Web Application” > Enter Name “Samples.AspCoreEF” & Location > OK.

After we will
select the temple “Web Application”
and we confirm the choice by clicking on OK.
III.
Add Class Library Core to the solution :
Samples.AspCoreEF.DAL.EF

Now, we take a
look to Samples.AspCoreEF project
structure, as shown in the screenshot, given below:

The project Samples.AspCoreEF.DAL.EF
will contain our EntityFramework models, migrations, context … (This is the
reason to the name DAL: Data Access Layer).
IV.
4- Create model
classes: Task and Person
We will add to
the Samples.AspCoreEF.DAL.EF project
the Models folder that will contains two models: Person.cs and Task.cs.


In project.json
:
We install the
Entity Framework Core package for the database provider from NuGet Package
Manager Console in Visual Studio 2015.


V.
Add Context: TaskSystemDbContext
We have to add a
new folder called EntityFramework where we will add our context like bellow.

So we will have
this structure:

VI.
Register the context class with Dependency Injection
We will work now in the ASP.NET Web Application to be
able to register our context.
We will start by adding Samples.AspCoreEF.DAL.EF as a reference to
Samples.AspCoreEF.

After we will add needed references to generate our database
as before, so, our project.json will have this look:

In the
Startup.cs, we will add two blocs to show you how we can register context class
in two different ways: So in this method
:
public void ConfigureServices(IServiceCollection services)
After: services.AddMvc();
We will add this
bloc related to the connection to the Sql Server Database:
//Using SQL Server
var sqlconnection = @"Server=(localdb)\v11.0;Database=samplecoreEF;Trusted_Connection=True;";
services.AddDbContext<TaskSystemDbContext>(dbcontextoption
=> dbcontextoption.UseSqlServer(sqlconnection));
sqlconnection is a hardcoded
string and we use UseSqlServer to connect to the
Database.
But,
it’s better to add this string in configuration file, before we can add these
string in web.config but in Core, this file doesn’t exist anymore but we can use:
appsettings.json file where you can add all settings related to your web
application so:

So we will call
it in Startup.cs in this way:
//Using
Postgresql
var connectionString = Configuration["DbContextSettings:ConnectionString"];
services.AddDbContext<TaskSystemDbContext>(
opts =>
opts.UseNpgsql(connectionString)
);
Now, we will create our database:
Toolsè NuGet Package Manager and then we click on Package Manager Console menu:
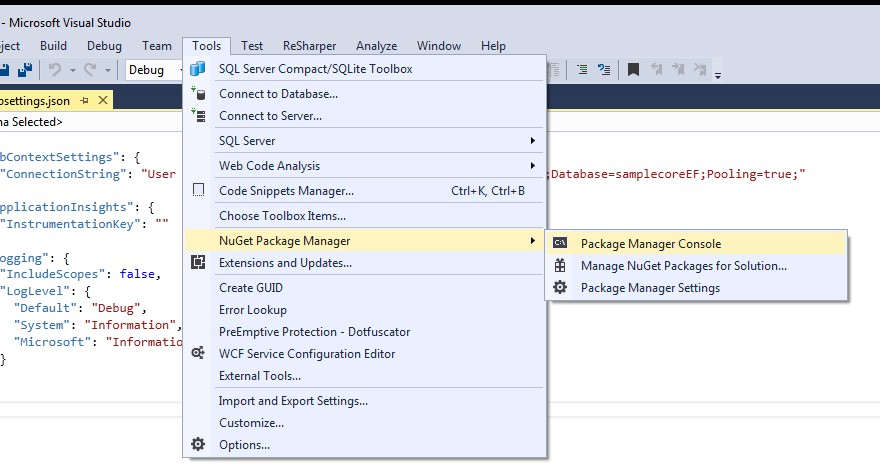
Type Add-Migration CoreMigration and Enter:

And we will have
Migration folder added in the solution:

And if we check
the Databases, we will find that tables are added automatically.
And if the
database exist we use Update-Database.
Sometimes we get
some error like bellow:

So, to resolve it we have to restart Visual
Studio as an administrator and enable the migration.
PM> Enable-Migrations
And if you get this message,
you have to update the PowerShell version: https://www.microsoft.com/en-us/download/details.aspx?id=50395
VII.
Add Web API controller and test using Postman.
Now, we will add new API
Controller called PersonController.

And test your API using Postman.


0 commentaires:
Enregistrer un commentaire